
-------------------------------------------------------------------------------------------------
Assalamualeykum (peace be on you) and hi there!
I'm very happy and honoured to be guest-posting for Emma-lee, who's obviously a very talented and passionate blogger!
My name is Aysha and I'm the blogger behind The Creative Muslimah. Besides being a part-time blogger, I'm a full-time student and a jewelry-making fanatic; especially when it involves polymer clay!
And let's face it. Sometimes we're just standing there in a store, adoring a beautiful pair of earrings or a necklace, but the price tag just doesn't seem to be quite friendly. Often we end up walking away from love at first sight, and that's rather sad. But here's where DIY'ing enters the picture! Have you ever thought of DIY'ing some jewelry items and accessories instead of buying them? If not, then tune in, because polymer clay is definitely one of the best materials to use for this purpose!
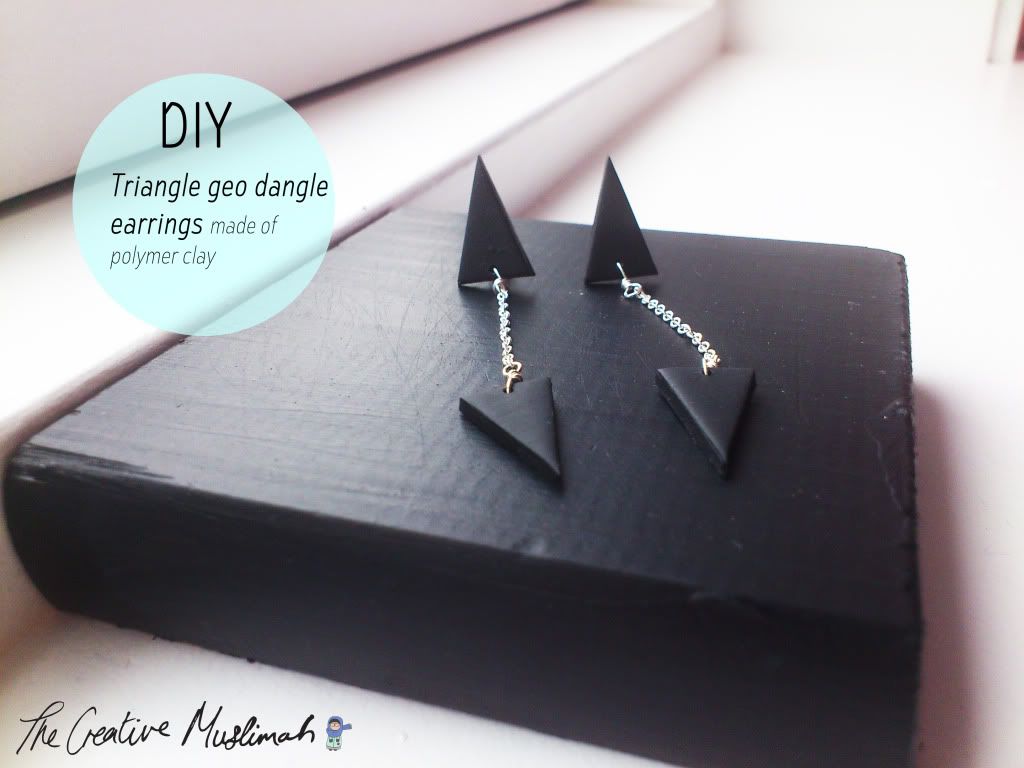
Today, I'll be sharing a very simple tutorial on how to make these geometric triangular dangle earrings out of polymer clay and a few other supplies:
I tried being all nifty and making a one-picture tutorial in Adobe Photoshop, so please bear with me, as my skills in Photoshop are very, very amateur. :-)
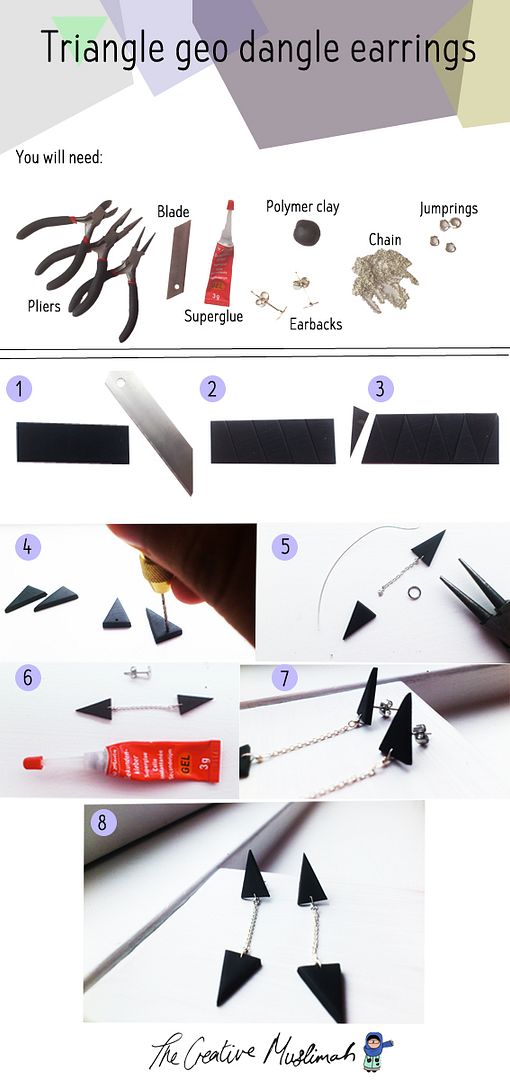
Step 1: Condition your clay and roll it flat. Cut it into a rectangle.
Step 2: Cut diagonal lines on the rectangle as shown in picture 2.
Step 3: Cut diagonal lines in the opposite direction of the first ones as shown in picture 3. That way, you'll get lots of triangles on your clay sheet.
Step 4: If you do not have a pinvise as I do, then now's the time to poke a hole in the top of your triangles for the jumprings to sit, and follow rest of the instructions. Otherwise, leave them as they are and bake them according to the clay package instructions. I use FIMO soft, which needs to be baked at 110 degrees Celsius for 30 minutes.
If you DO have a pinvise like me, then after your clay has baked and cooled down, drill a hole in the top of your triangles as you would've poked them.
Step 5: Attach a small length of chain to one of the holes with the help of pliers and either a jumpring or some wire (as I did). Then attach the other end of the chain to the other triangle.
Step 6: Glue earbacks onto two of the triangles and let them be until the glue has set.
And voila! You can now enjoy your new addition to your jewelry collection! Wasn't that easy?
These geometric earrings are sleek and simple, yet they make a sure statement, don't you think?
If you liked this tutorial, be sure to check out my other polymer clay related DIY tutorials and do let me know what you think!
Thanks again to the lovely Emma-lee for having me over!
Yours sincerely,
Aysha @ The Creative Muslimah
----------------------------------------------------------------------------
If you are interested in Guest Posting on In Real Life, please visit the Guest Post page for more info.
Thanks!
xo Emma-lee
Oh, I agree. Polymer clay is amazing stuff.
ReplyDeleteHey, I just found your blog via Happiness Is, and it's adorable! New follower:)
ReplyDelete♥Mandi
mandisolomon.blogspot.com
Hi Emma-lee! Thanks again for sharing this post! :-)
ReplyDeleteI hope you all will find it useful! Let me know if there are any questions or if you've made a version, I'd love to see 'em!
Cute!! Such a great DIY!
ReplyDeleteJillian - http://epic-thread.blogspot.com